Formatting Your Manuscript for Query Submissions
January 20, 2023
If you’re taking an old gander at this post then I hope it means the glorious day has arrived and you’ve received your first partial or full request!!
It’s entirely possible—given a lot of agents accept queries through query manager where you’ll copy and paste in your samples pages OR ask that you paste your pages into the body of an email to them—that you have not, up until this point, really thought about how to professionally format your manuscript. Betas and CPs don’t require it and if you’re new to this (like I was) a lot of this isn’t common knowledge when you’re out of the industry.
Regardless of where you like to write, be it Google Docs, Scrivener or even Word itself, most agents will request you upload your work in a Microsoft Word or PDF file, and there are certain industry expectations for how that file is going to appear.
I’m hardly an expert, but I guess I mustn’t have stuffed this up too hideously as no agent felt the need to stop in the middle of their hectically busy days, email me back and scream dear god, my eyes so here are a few things I did, in case they’re of any help to anyone else. To note too, I still have not mastered the use of Scrivener, so it’s entirely possible it has some clever tricks in there that let you export your file automatically to these settings . . . but today, I’m going to go through how to update your file within Microsoft Word itself.
Alright, let’s get that manuscript looking spiffy and ready for its big day!
Layout
I’d say most of us know this first part—you want to be working with a portrait A4 document and should be using Times New Roman font in size 12pt, with your lines double-spaced. There should also be no crazy fonts, coloured text, highlighting, borders or images—it should only be you and your words out there.
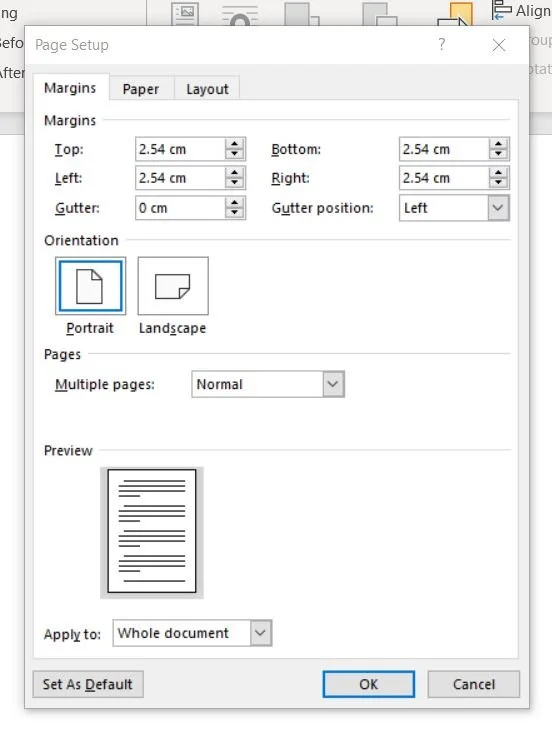
Next up, quickly double check that your margins are set to 1-inch (2.54cm) around each side. This is often the default setting under: Layout > Margins > Normal. However, if for whatever reason yours are not set up like this you can adjust it by clicking Custom Margins… at the bottom of the menu and typing in the desired amount in the Top, Bottom, Left and Right fields.
To help make your document easy to read it is then recommended you indent your paragraphs. The standard is generally to indent the first line of all paragraphs by 0.5 inches. And here’s the part where I would advise you to accept the following as your new mantra—
Back away from the tab key and spacebar, cowboy. . .
You’ll drive your future editor, and probably your future agent, absolutely nuts. When we add in tabs or spaces manually they can appear differently when someone else opens our document on another computer or even in another version of Word. I’m also fairly certain there is no universal way of undoing the manual formatting so correcting it is a massive undertaking.
To ensure your manuscript stays looking it’s beautiful self it is best to avoid any manual tabbing or spacing altogether and to use Word’s wider features to get the same effect.
To indent your paragraphs head to:
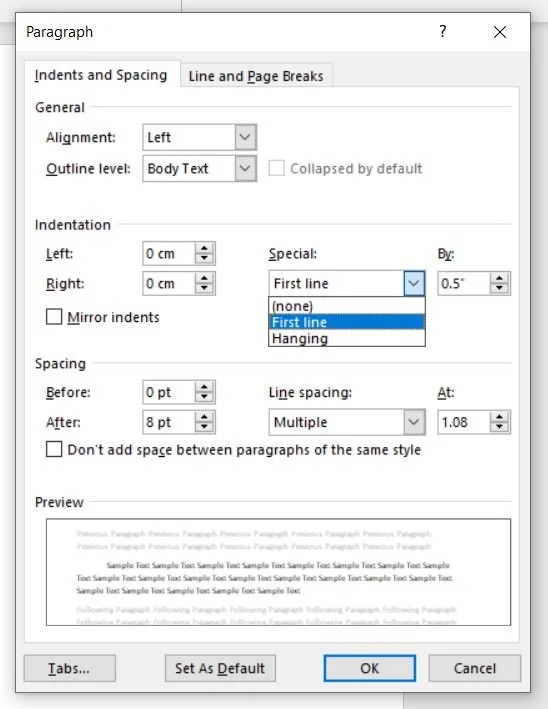
Layout > Paragraphs and click the little arrow in the bottom right-hand corner to access the pop up Paragraph menu (below). Within the pop up menu head to the Indentation section. Under the Special dropbox select ‘First Line’ and in the By box type in either 0.5” or 1.27cm. Then hit ok. You should see this take effect throughout your manuscript.
I have seen some people say that there should be no indentation on the first line of a new chapter, so if you prefer how that looks you can simply go and ‘backspace’ it from your opening chapter paragraphs.
Speaking of chapters, we want every new chapter to start on a brand new page, and some people like the chapter to start approximately half way down the page as well. To do this, follow the steps below:
Insert a Page Break
At the end of the previous chapter, place your cursor after the last word, and head to: Layout > Breaks > Page. This should jump your next chapter right on to the next page.
Add Header Style Formatting
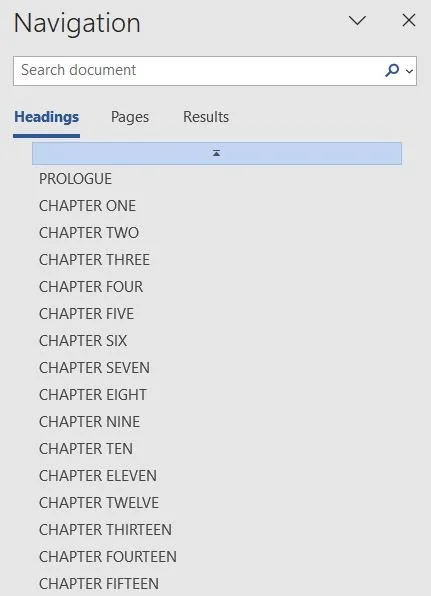
To get your chapter to start half way down the page we’re going to add some custom formatting to the chapter title itself. This will benefit us in two ways—1) the formatting will remain consistent where ever the document is opened and 2) by using ‘Heading’ formatting you’ll automatically be setting up a chapter menu which you (and the agent) can use to navigate through as you read.
To do this, click on the Home tab in the main menu then head on over to the Styles section. For this example I like to use the Style Heading 1, but you can work with any of the Heading Styles you like.
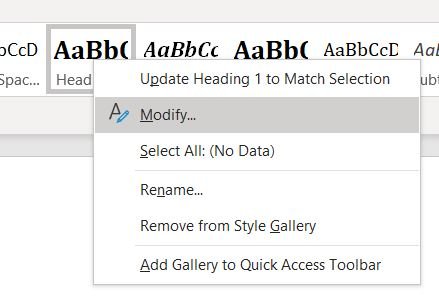
Select the Heading Style and right click, then select Modify.
Within the Modify Style menu format your text how you would like all your chapter headings to universally appear. For me, I’ve selected Times New Roman, Size 14pt, colour black and I’m aligning by centre. Once you’ve done that, click on Format in the bottom left corner, and select Paragraph.
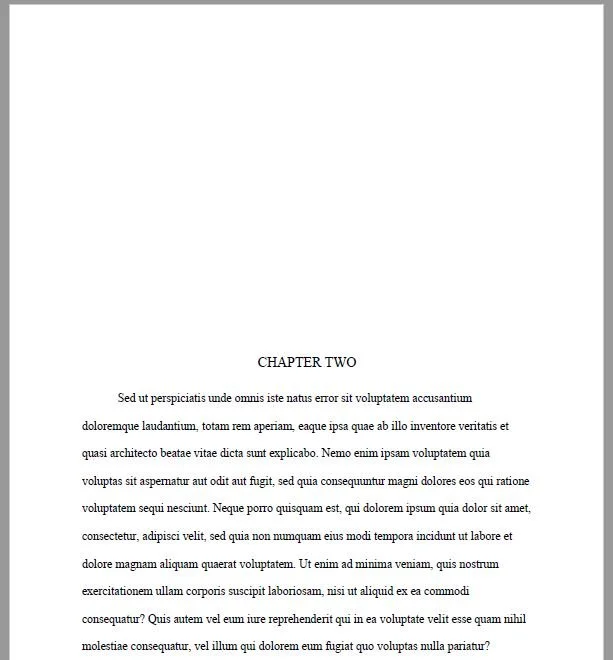
Within the Paragraph menu look down the bottom to the section called Spacing. Now here’s where you might like to play around with your own numbers to see what you think looks best, but I tend to put 250pt in Before, and 20pt in After. This adds a large amount of spacing before my Chapter Title (bringing it roughly halfway down the page) and a small amount of padding after my Chapter Title, before the starting paragraph. Once you’re happy with how yours is looking, go through each of your Chapter Titles, highlight them and set their formatting style to the Heading Style you’ve created. Hopefully it will look something like this:
Add a Cover Page and Back Page
The first page of your document should include some key details for the agents easy reference. I also liked to add an end page to help make it clear they’ve reached the end of my submission, and to reiterate how they can get in touch. Some of these details include your manuscript title, your name, your contact details and possibly even your word count or genre. I also personally liked to add the agent’s name and their agency’s name too, as well as the date I submitted. I won’t stifle your creativity in this space but below is an example of how I liked to lay this out, for reference. Left (front), Right (back).
Add Page Headers and Numbers
For every page we want our manuscript title, our name and a page number to appear in (usually) the top right-hand corner. To set this up head to Insert > Page Number > Top of Page > Pick the option where the number is set to the far right. Now click into your header section and add your manuscript title and name before the page number. I like to lay it out like so:
MANUSCRIPT NAME | Author’s Name | 1
Click “Close Header & Footer” to save. Now this should appear on every single page of your document. However, we have one more step to go, because ideally we want those page numbers to begin counting from the first page of our story NOT from our cover page. To do this, double click on your header to open up the settings again and under the Header & Footer tab select: Page Number > Format Page Number
Under Page Numbering, select ‘Start at’ and type 0 into the box provided. Click ok.
Lastly, still under your Header & Footer options move to the options section and tick on “Different First Page”. This should make the header on your cover page disappear (or if it doesn’t you should simply be able to delete it), and your numbers to start counting from one, on your second page.
The finishing touches…
By now you’ll hopefully have a pretty good looking manuscript on your hands. A couple final items to quickly consider before you send it off on its merry way . . .
Make sure you have accepted any Track Changes you or any of your readers may have entered into the document
Likewise, ensure all Comments have been deleted
Save your file out with a sensible filename i.e. DANCE OF THE UNVEILED-Emilie Victoria-Full Manuscript Submission.docx
Do one final proof read and check!
And I think that’s about it. If you have indeed received a request then a huge congratulations to you, because that’s a massive achieve on it’s own! I hope you found this information helpful and I wish you all the magical agent fairy dust and best wishes on your submission, and continued journey on to publication.
Image via giphy.com


